Tag Archives: music video

Costuming an Opera, Part 4 – Idamante from Idomeneo

29 Apr

Somehow I managed to get through this thing without any pictures of Idamante alone.

His costume is a navy blue linen. The actor, Brett, is incredibly tall, and the first time Catey and I made his costume, it was like a mini-skirt. I have pictures of the making of that costume, but that wasn’t the costume he wore as we had to go remake it with a longer hem.

A scene from Idomeneo featuring three of the leads, Idamante, Idomeneo and Elettra. Costumes by Tyson Vick and Catey Lockhart.

A scene from Idomeneo featuring three of the leads, Idamante, Idomeneo and Elettra. Costumes by Tyson Vick and Catey Lockhart.

Below you can see Idamante’s outfit more clearly… lol. I jokes. That’s just a picture of him nearly getting his head chopped off!

That one dude's gonna kill that other guy.

That one dude’s gonna kill that other guy.

But if you watch the video of Brett performing “Non temer amato bene” you will get to see his costume, fancy belt and cape in action! Check it out below:

Please remember to subscribe if you’d like to see more of my costuming posts!

Costuming an Opera, Part 3 – The Princesses of Idomeneo

28 Apr

The opera Idomeneo features many things — many tenors, many sea monster deaths and many princesses. This post consists of two rival princesses, Ilia and Elettra, and the costumes Catey and I made for them in the University of Montana’s production.

Ilia, a Trojan Princess, in the opera Idomeneo. Costume by Tyson Vick and Catey Lockhart.

Ilia, a Trojan Princess, in the opera Idomeneo. Costume by Tyson Vick and Catey Lockhart.

Ilia wears a beautiful green-blue silk/metal blend. The fabric is the second most expensive fabric in the opera, fitting her station as a princess. I only got one before picture — the one where the fabric was just lying around, so you’ll have to imagine how it was put together!

The fabric before becoming a dress and after becoming a dress on actress Carly as Ilia.

The fabric before becoming a dress and after becoming a dress on actress Carly as Ilia.

The dress was made to be worn three different ways, but during the production it seemed to settle on the one seen in these pictures. The dress is soft and light to reflect the character of the princess, who is the romantic lead of the play.

Ilia tells Idomeneo that he's like a father to her.

Ilia tells Idomeneo that he’s like a father to her.

You can view Ilia’s dress wafting around in the video below:

Elettra, the rival princess, is a visitor to Crete. She is alternately snubbed and ignored by the entirety of the cast, with a few bones thrown her way — mainly by Idomeneo and Ilia. She wants to marry prince Idamante, but generally just gets crazier and crazier. I wanted her to stand apart from the rest of the characters in both color scheme and dress shape. Each time she comes on stage her dress changes a little.

Elettra's dress in its three forms. Costume by Tyson Vick.

Elettra’s dress in its three forms at a fitting. Costume by Tyson Vick.

I did not get any images of the creation of this dress because it took a lot of thought. It has around 13 yards of fabric in it, a gold metallic underskirt with gold netting overlay that flows in a train behind her.

Some images of her moving can be seen below. The effect was very beautiful.

The only pics I could get of Elettra's dress from different angles.

The only pics I could get of Elettra’s dress from different angles.

There is a hoop under her skirt to give some volume to the many gold layers. Watching her rise and fall was very fun.

Elettra in the opera Idomeneo wears a costume by Tyson Vick.

Elettra in the opera Idomeneo wears a costume by Tyson Vick.

Below you can see a video of Elettra’s dress in action:

Please subscribe for more updates on my Mozart costumes!

Costuming an Opera, Part 2 – Creating Idomeneo

27 Apr

The lead character of the opera “Idomeneo” by Mozart is the King of Crete, Idomeneo. When Catey and I were asked to costume this opera, it was important to give Idomeneo a Kingly look.

Idomeneo laments having to stab his own kid to death.

Idomeneo laments having to stab his own kid to death.

I based my basic concept for the lead costume off of the original costume from the first performance of the opera back when Mozart wrote it:

The original Idomeneo costume.

The original Idomeneo costume.

When Idomeneo first washes up on shore, something that happens to people a lot in this play, I wanted to evoke a wet feel. There wasn’t a large budget for much set design, so I took a very textured gold fabric and overlayed a sheer sparkling blue on top to express coming out of the sea.

The lowest layer of Idomeneo's costume under construction. The textured fabric is covered by a sparkly sheer overlay to evoke wetness.

The lowest layer of Idomeneo’s costume under construction. The textured fabric is covered by a sparkly sheer overlay to evoke wetness.

The costume can be seen on stage below as Idomeneo confronts the specter of the person he has vowed to kill, a specter which haunts him.

The sparkly costume in action on actor Ben as Idomeneo.

The sparkly costume in action on actor Ben as Idomeneo.

When he returns home to his throne, he dons his coat, cape and armor.

The coat is one of the two most expensive fabrics in the opera. I once attended a play of cobbled together costumes where the monarch was wearing polyester (because someone thought it looked shiny, and therefore rich, or something) and the poor people were wearing silk, linen and cotton that had been distressed (so it looked shabby?) I decided to avoid the mistake of costuming the richest person in the cheapest fabric, so here you go, Idomeneo, at $35/yd, this coat is the richest piece in the opera.

The idomeneo fabric. Catey and I lay out pattern pieces to fit.

The idomeneo fabric. Catey and I lay out pattern pieces to fit.

The coat is a standard Rococo cut, like a pirate frock coat. If lifted from the bottom front over the top of the head, it creates a full circle of fabric.

Idomeneo's costume under construction. Catey cuts out the pieces.

Idomeneo’s costume under construction. Catey cuts out the pieces.

Catey and I did not manage to line up all of the diamond pattern at the seams, but what you gonna do?

Pinning together the Idomeneo coat.

Pinning together the Idomeneo coat.

We had to travel a few times to the University to take measurements of the entire cast. I also returned later to try some things on the actors.

Below you can see images from the first and final fittings.

The actor of Idomeneo, Ben, at his first fitting and final fitting.

The actor of Idomeneo, Ben, at his first fitting and final fitting.

We also did not have the budget for real armor, so a costume breastplate was used.

A scene from Idomeneo featuring three of the leads, Idamante, Idomeneo and Elettra. Costumes by Tyson Vick and Catey Lockhart.

A scene from Idomeneo featuring three of the leads, Idamante, Idomeneo and Elettra. Costumes by Tyson Vick and Catey Lockhart.

I was quite pleased with the way Idomeneo’s costume looked on stage. It was regal, evoked tradition, and seemed to help the actor, Ben, get into character.

Below you can watch a video from a dress rehearsal of Ben Fox in full costume as Idomeneo!

Please subscribe to get more behind-the-scenes of my costuming endeavors!

Mitridate – Illustrating an Opera, Part 5

19 Feb

For the past four weeks, I have shared the process that goes into taking a single Mozart Project photo. The picture that I have been describing is the illustration to Mitridate, Act III, which is the most well documented photograph that I have taken.

If you would like to catch up, Part 1 discusses the opera, music and design for the photograph. Part 2 tells about my trip to photograph the model. Part 3 shows various shots which were needed to make a composite image. Part 4 describes how I designed and created a Prison Tower in Miniature for the photograph.

This is the photo that I will be showing you how I made! Mitridate, Act III, by Tyson Vick.

This is the photo that I will be showing you how I made! Mitridate, Act III, by Tyson Vick.

In this fifth post, I will share with you how I used all these images to make a final composite image.

Final Composite

Now, as a warning to my more sensitive readers, the curtain will be lifted, and all the mystery of this image will disappear once you learn how it is composited. You may die a little on the inside. So, if keeping the mystery alive is important to you, please, go no further.

Beware. Beware!

Trevor Ivanich as Farnace

This is the original image of Trevor Ivanich used in the composition.

Once all of my images are collected, I begin to edit them, and put them together in a digital composite. I use a program called Corel, which is like Photoshop, however where Photoshop is an all-encompassing graphics program, Corel has gradually become more focused on re-creating artistic mediums (Paints, Pencils, Brushes).

Once I have scanned the image, I give it any necessary touch-ups. These can include removing blemishes from the model, removing scratches and dust from the film, adding highlights, correcting colors, etc. Next, I cut the image out of its original background.

Trevor removed from Background

Here is Trevor, revomed from his background to be placed in the composite image.

Now, I am ready to composite.

The first thing I do is create a digital “mock-up” of the image I want to make.

Using crude cutting and pasting methods, I create a little collage with all the elements I am considering. With Mitridate, I made one mock-up with the picture of Trevor, the model, when it was first edited, and I drew solid shapes in roughly where I wanted to place background elements.

After I had photographed the Tower and wall, I made a second mock-up. During this process, I look for a natural and attractive composition of the elements.

Mitridate Mock-ups

Two Mock-up Images. The first has a background drawn in. The second has the photographic elements roughed in. Originally, I was thinking of putting boats in the harbor.

While I do build the background and foreground separately in the computer, I also add them together and adjust the elements after every little change I make. For example, I put Farnace in the picture, then I add the wall behind him. I adjust the wall and the character until they are in a good place. Then, I remove Farnace to edit the wall. These edits can include re-sizing and re-coloring, as well as adding grain.

I do this until all the elements match up, and I am pleased with the result. Sometimes I have to take some time away from the image, not looking at it, to return to it fresh and see where any issues may lie.

Mitridate Act III composite Images.

Composite of Sky and Water
This is the farthest background part of the composite. The sky, the water and the tower have been combined, color matched, matched for grain, blurred, etc.
Tower added to sky and water

The next layer is off the birds flying out of the prison tower. This image has also been matched for light, grain, color, etc. The reason there is a blank spot in the corner is because that part of the image will be covered by the wall, and so there’s no point in putting anything there.

Broken wall added to Background

Next, the Broken Wall in the foreground is added. All these elements are built around each other to yield an attractive composition.

Mitridate Act 3 by Tyson Vick

Finally, Trevor (as Farnace) is situated in the photo. Like the others, he is matched to the light, the grain and the color. Now the photo is complete.

So, now the image has gone from the text of one man’s play, to the operatic setting of another man’s music; From the interpretation of one listener’s imagination, to the execution of this idea in real life. Which, hopefully, will interest somebody else in returning to the original play, and the whole process will start again, as our lives are connected by music, drama, emotional truth, friendship, adventure and life!

Mitridate Libretto, Sketch, Photo

The original title page to the Mitridate Libretto which inspired my Farnace sketch which was brought to life by Trevor Ivanich in my Photograph!

My ultimate goal with this project, when it is finished, is to share the joy I have experienced through the music of Mozart!

Again, here is the song which my photograph illustrates, to complete my post  “Mitridate – Illustrating an Opera”. Thanks for reading!

Mitridate – Illustrating an Opera, Part 3

5 Feb

Proceeding with my super-sized post, I will continue sharing what goes into one single Mozart Project photo. You can catch Part 1 if you want to learn about the design and music or Part 2 if you want to watch my mad photography skillz in action.

Of all the pictures that I have taken for Mozart Project, the photo for Mitridate, Act 3, is the most well documented.

This is the photo that I will be showing you how I made! Mitridate, Act III, by Tyson Vick.

This is the photo that I will be showing you how I made! Mitridate, Act III, by Tyson Vick.

In this third post, I will share with you my year-long travels to get the right shots to make a composite background for my photograph!

Composite Photography Elements

Accurate theatrical settings (exotic homes, buildings, locations) are almost impossible to secure when illustrating an opera scene through photography, and so I rely mainly on illusion. This either occurs in the actual photography, or in computer graphics which are added in afterward. Many of my photos for this project limit the viewing area to a small space (nothing outside the photo border is seen). This allows the viewer to infer, from props that are strewn about, what the full setting looks like. Other photos, like this photo for Mitridate, Act III,  are actually just taken in front of a blank wall and have various background elements added in after the fact.

That’s not to say it is easier to use computer altered backgrounds. I still have to photograph the elements of the background, as well as the model/actor. In this particular photo, I utilized 8 separate images.

  1. Model – Trevor Ivanich
  2. Sky
  3. Rock wall (2 images)
  4. Sea Cliff
  5. Birds
  6. Tower (2 images)

Sky

Montana Sky

Montanan sky, Big Sky country, used for the composite.

I live in Montana which is affectionately known as the Big Sky Country. This is an apt description, as it seems that the sky is at its fullest and most dynamic almost every day of the year, and is constantly changing due to landscape which features large mountains cascading into flat plains.

Every time I see a particularly striking sky, I run out and take pictures of it for my collection. Some days, though, I just sit and look at it and wonder if it could ever accurately be captured on film.

To quote the source, “Standing under the big sky, I feel free”.

Birds

During one of my trips to Nebraska, the geese were migrating.

Every year 14 to 16 million geese and ducks fly on through the Grand Island, Nebraska, area.

My mother and I drove out into the countryside to take pictures of these thousands of birds flying through the sky. There were other photographers out and about, as well. We met one on a board walk, where there was a Bald Eagle just sitting out in the water with the geese.

It was a very pleasant day.

Grand Island Nebraska Geese Migration

The migration of the geese near Grand Island Nebraska.

Sea Cliff

Sea Cliff

The Sea Cliff used in the Composite from my parents old slides.

Sometimes instead of taking a picture, I go through my parents old slides. Neither of them, it seems, ever cared to keep them, and so I spirited them away. During their travels my Dad took some landscape photos which work their way into my Mozart Project in the background. One photo of a sea cliff was used in my Mitridate Act 3 photo.

Rock wall (2 images)

Outside of Helena Montana there are numerous large ruins. They are apparently fallen chimneys, ovens and smokestacks, and are made of large stones and bricks. They remind me of the castle ruins of Great Britain. These structures are “Lime Kilns”, or ovens that were used to process Lime into a substance used for mortar. They went out of business in the late 1800s, when another Montanan lime company built their ovens right next to the railroad, cutting out the over-land transportation, and making the Helena lime kilns too costly to keep running.

Because the structures themselves are almost completely toppled, from many angles you can’t tell they are ovens, and they just look like general ruins.

My cousin Elizabeth, her dog, Harley, and I, took a brief trip out to these ruins to photograph these collapsed walls and fallen brickworks. This was something I had in mind even before taking Trevor’s photo as Farnace a year earlier. That’s to say, his photo was taken knowing that one of these walls would eventually be composited behind him, which is why, in his image, the backdrop is half white (sky) and half black (wall).

Ruins in Helena

The ruins in Helena, MT, with Harley and Elizabeth.

Bonus Music Clip

As a bonus, here is one of my favorite singers, Philippe Jaroussky, singing the Act III scene which I illustrated and which I have devoted these last three posts to discussing! I’m not sure if Jaroussky’s voice is quite right for this role, but his bow-tie looks like it exploded, so that’s pretty cool!

I have all of his albums. I hope he makes a Mozart album!

Here are the english lyrics:

Recitative:

FARNACE
I must go… Oh, Heaven, but where
Shall I direct my bold steps?
Ah, I hear you,
O sacred, powerful voices of nature,
O proud remorse of my heart. No, I am not
So callous, and at this price, for this
Throne, Aspasia, Romans, I detest you.

No. 24 Aria

FARNACE
Now from my eyes the veil is lifted,
Base affections, I abandon you:
I have repented and heed
Only the cries of my heart.
It is high time that reason
Returns to rule in me;
Now I retrace the fair path
Of glory and honour.

COMING UP NEXT – Conquering the Prison Tower in Miniature! (What on Earth could that possibly mean? Find out next week!)

Mitridate Act III set sketch

Mitridate – Illustrating an Opera, Part 1

24 Jan

I would like to share my entire process from start to finish for one photo, so you can see what I do. Of all the pictures that I have taken for Mozart Project, the photo for Mitridate, Act 3, is the most well documented. This will take more than one blog post, so I will be breaking this post into pieces for ease of reading.

This is the photo that I will be showing you how I made! Mitridate, Act III, by Tyson Vick.

This is the photo that I will be showing you how I made! Mitridate, Act III, by Tyson Vick.

In this first post, I will share with you a brief synopsis of “Mitridate”, the music from Act III which my image is based around, some design sketches, and an overview of the equipment I use!

Story

If you were to ask me what my favorite works of Mozart were, I would say, “The Marriage of Figaro” and “Mitridate.” Mitridate is a perfect execution of the Opera Seria style with fantastic music throughout, which reinforces a solid and competent drama. Opera Seria is the older classical style where the play was a framework for showpiece arias that were sung alternating by cast members.

Mozart’s “Mitridate” is about the famous and tyrannical ancient-world tyrant, Mithridates and his two sons, Farnace and Sifare. While Mitridate is out fighting the Romans, his two sons, who are supposed to be protecting their home-land, are busy trying to seduce Mitridate’s young fiancée, Aspasia. Farnace, the wicked brother, is trying to take her by force, when she hires Sifare, the nice brother, to protect her. However, by the time Mitridate returns, Aspasia is in love with Sifare.

Mitridate finds out about all these betrayals, and it’s at this point that he comes up with elaborate executions for everyone involved. Meanwhile, Farnace has impetuously given a Roman envoy access to the city, and the Roman’s attack at the vital moment! The Father and sons have to put their personal lives aside, and are left to prove their mettle.

The album cover to “Mitridate” recorded by Christophe Rousset is the only perfect Mozart recording I’ve listened to. I truly think it is the only flawless opera record I’ve ever heard. I highly recommend it.

Act Three is the part of the play that concerns us for this blog post, because it is a scene in Act Three that I chose to illustrate through photography

Farnace is imprisoned by his father to await execution. The Romans blow up the prison cell and give him a sword in hopes that he will aid them in conquering his father. It is at this moment that the world slows around him, and he realizes he’s been a young, rash, fool. He laments his poor choices, and for letting down his father and country. This scene is set to a long and beautiful aria, full of regret and introspection. Farnace then makes the decision to repent his ways, and sets out to set fire to the Roman fleet.

Music

Take a moment to relax.

Wind down.

And listen to the aria from Act III which I chose to illustrate… “Gia dagli occhi il velo e tolto”.

Here are the lyrics translated:

FARNACE
Now from my eyes the veil is lifted,
Base affections, I abandon you:
I have repented and heed
Only the cries of my heart.
It is high time that reason
Returns to rule in me;
Now I retrace the fair path
Of glory and honour.

Design

My photos of Mitridate are set in period appropriate costuming. I looked up contemporary statues for costume ideas. Mitridate is represented as both a young man and as an older man in art, but because my focus was on his son Farnace, I chose to base the character design off of one particular statue of Diomedes.

Statues of Mitridate and Diomedes

Here are two statues. The one on the left is Mitridate, himself. The one on the right is Diomedes, who was the costume inspiration for Farnace in my photo.

I first designed Farnace after listening to the opera “Mitridate” for the first time back around 2003. This sketch of Farnace utilized a type of tattoo design that is my specialty, and I use it in various place in my artwork: sketches, body paint, fabric art, etc. I call this design “clockwork”, because it reminds me of various shifting gears and other mechanized innards.

Diomedes Statue and Farnace Sketch

On the left is poor Diomedes, who appears to have had both his “human-horn” and his “lower horn” harvested by Omicronians. On the right is my pencil sketch of Farnace.

Upon first listening, I also sketched little images of the sets from various acts just for fun.

When I came to illustrate Act 3 through photography, I chose to mix my Farnace with my set design in the real world.

Mitridate Act III set sketch

My sketch for the prison set of Act III in the opera “Mitridate”

Equipment

In order to photograph a scene from a Mozart Opera, I need three things: Costumes, Models and Camera Equipment. Here is the Photography Equipment that I use:

I use a camera called a Canon EOS Elan 7, with a 28-90mm Lens. I inherited this from my grandfather, upon his death, after my own Canon camera was stolen under mysterious circumstances.

This is a film camera, and I use a film called Kodak Portra NC (Natural Color). I usually used 400 speed, but sometimes I change it up. I have also used Kodak High Definition film, and Kodak Portra VC (Vivid Color) for the project.

Once my photos are taken, I have the negatives processed, then I use a negative scanner called a Nikon Super Coolscan 5000 ED.

When the photos are scanned, I open all the files and narrow it down to the best. I then edit the best photo using Corel Photo Paint 12 (It’s not Photoshop, but I have learned how to use it pretty fully.)

Accurate location settings are almost impossible to secure, and so I rely mainly on illusion, either in the actual photography, or in computer graphics added in afterwards. Many of my photos for this project limit the viewing area to so small a space that the setting can be inferred from props that are strewn about, while other photos are actually just taken in front of a blank wall and have backgrounds added in after the fact. This equipment helps me to create these illusions.

I also carry a reflector board on every shoot.

COMING UP NEXT – Photographing the model Trevor Ivanich as Farnace!

Tyson Vick and Trevor Ivanich

Il Re Pastore – A Fugitive Princess

10 Jan

Mozart’s opera “Il Re Pastore” (The Shepherd King) is a piece of historical fiction telling the story of how Alexander the Great conquered the tyrant ruler of  Sidon, Stratone, only to discover the rightful heir to the throne, Aminta, had been living incognito as a peasant for many years (in an attempt to escape the tyrant’s wrath); and how Alexander re-instates the poor man to the throne.

The opera has no antagonist, which makes it dramatically relaxed (A bit like Winnie the Pooh), where most of the problems arise due to assumptions, miscommunication, longings and fears. It is not boring, however, due to the author’s use of emotional truth as the basis to the events (as per usual for Metastasio), rather than relying entirely on the music or theatricality.

When Alexander the Great defeats the tyrant Stratone, the tyrant’s daughter, Tamiri, is left to flee into the forest for safety as a “Fugitive Princess”. There, she sings songs with nature metaphors, falls in love with one Alexander’s men, is nearly forced to marry the Shepherd King, and in the end is pardoned for her crime of being a tyrant’s daughter.

Tamiri is quite a resilient Fugitive Princess, a post which she occupies with all of the nobility that an 18th Century Princess could muster, even though she’s supposed to be an ancient princess, disguised as a shepherdess, and hiding amongst the woods in quite a dangerous situation. She actually strikes me as sticking out like a sore thumb with how little effort she gives to the “Fugitive” part (changing her clothes), and how much she emphasizes the “Princess” part (as any member of the play’s contemporary Noble audience would have expected.)

It is this line, said by a soldier to the Fugitive Princess, that directed my entire design of Tamiri for my photography:

“You here? You, in this state of undress?”

So now we have a Fugitive Princess hiding in the woods, unconvincingly, in a state of undress. Now isn’t that enough to inspire any costume designer! I took the idea and ran with it.

In accordance with mixing the 1700s with the ancient world, I decided upon dressing Tamiri in fancy Rococo underwear and wig, but keeping her true-love in the classic Greek attire. I also wanted to reflect the personality that I interpreted of Tamiri when I read about her going Fugitive. Particularly, I liked the idea of a Princess thinking the best way to disguise herself while hiding in the woods would be to wear clothing that had a nature motif, with a wig decked out in different twigs and gourds.  “Now no one will be able to recognize me! Ha! Ha!”

Which, of course, is kind of silly, but it’s also the kind of thinking that went into the costume design of opera in the 1700s.  They seemed less interested in credibility than they did in fashion.

My main influence was the floral applique and lace dress created by Eiko Ishioka in Tarsem Singh’s film, “The Fall.”

Eiko Ishioka Costume Design for Nurse Evelyn in The Fall

Eiko Ishioka Costume Design for Nurse Evelyn in “The Fall”

When I examined Nurse Evelyn’s dress in “The Fall”, I thought it was very beautiful, and I like how the texture turned to 3-D around the collar. Luckily, I accidentally stumbled upon a book at the fabric store that taught me how to create such an effect. The book was called “Embellish with Anything” by Gladys Love.

Embellish With Anything Cover and Ginkgo wallhanging

The Cover of “Embellish with Anything” by Glady’s Love, Her Ginkgo Wallhanging Project

The book “Embellish With Anything” is full of great information for fabric artists. This fully illustrated “how-to” book shows how to utilize and alter fabrics to create artwork. The techniques are more advanced than general step-by-step guides, and require a little bit more equipment and patience to complete. However, the techniques can be used to create amazing and striking works of art.

One of her techniques is to create a Ginkgo Biloba inspired wall-hanging by making your own appliques, utilizing asymmetrical cutting and sewing techniques, and beading.

Ms. Love’s focus seems to be to bring out the reader’s creativity with ideas rather than just giving them a project to make, and the images in the book show a range of results created using her initial technique. Projects include making your own beads out of fabrics, making your own custom appliques, beading and machine embroidery, and a really ingenious use of the zig-zag stitch on a sewing machine to make a tree out of thread (on the cover).

Gladys Love also curates her own blog called Fibresoul where she shares her creative adventures.

I utilized her technique to embellish Tamiri’s nature inspired Bridal Corset.

Tamiri's Ginko Bridal Corset Front and Back

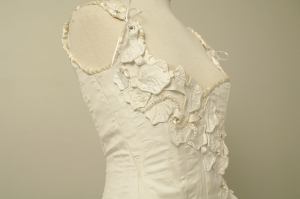
Tamiri’s Ginko Bridal Corset Front and Back

The corset is fully boned with plastic boning, and is based off of the innards of Simplicity Pattern #3635.

I wanted everything about the outfit to be ivory and white, so I used two colors of dupioni silk, white bridal satin, and ivory ribbon (ruched around the top edge) for the bodice section, and I used a large piece of folded crepe silk for the skirt. The corset interfacing and boning channels are covered with strips of ivory and white dupioni silk using a technique from the book which shows you how to cut the fabric in waves and sew it together flat, which gives it a bit of a “tree bark” look.

This “bark” fabric is then cut according the the shape of the corset.

Gingko bridal corset front.

Gingko bridal corset front.

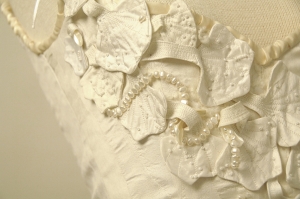
The appliques are drawn on to a piece of silk or satin and sewn to the facing fabric, then cut out and turned. Then, this turned “leaf” is topstiched with different types of embroidery thread (again I used Ivory and white) to make the “veins” of the leaves.

whiteginkorightsidedetail

The appliques are hand stitched to “bark” part of the fabric before it is attached to the boned interlining or the lining. The appliques are then dotted with seed beads which resemble dew. I also used strings of freshwater pearls weaving in and out of the leaves because they look quite similar to the flower of the Ginko tree. Finally I used ivory colored seashells as “twigs” for the “leaves” to wrap around.

whiteginkofrontdetail

While it may seem surprising to some readers, this “applique” process only took me the length of the films “Se7en” and “Zodiak: Director’s Cut” on DVD as well as a few un-noticed moments between films (around 5 hours). This is because I laid out the appliques, then drew a diagram which indicated where each leaf in which fabric and what color went where. Only the seed beads were attached randomly.

The corset was then assembled, and the ruched bias strip around the neckline was attached. The last step was to attach the crepe silk skirt which is double-layered in the front, and single layered in the back, and hand pleated (by eye rather than by markings) evenly around the hips.

whiteginkocorsetfrontback

If you would like to see the final image of Tamiri from this shoot, I have posted a video which features Tamiri’s Act 1 Aria “Di Tante Sue Procelle”, as well as the photograph I created in order to illustrate the scene! Though, I must admit the scene I illustrated is actually a recitative, not the aria that follows. A video that featured a recitative with my image, however, would be like listening to a random track on a foreign language audio-book.