Tag Archives: La Betulia Liberata

Mozart Reimagined Preorders Now Live on Kickstarter!

14 Sep

Hello friends! After ten years, Mozart Reimagined is now available for Pre-Order on Kickstarter!

You can watch some preview videos below, or just click on over to Kickstarter to learn more!

I hope you will all enjoy this labor of love!

If you feel passionately about my project, I would really appreciate it if you would share the Kickstarter link ( https://www.kickstarter.com/projects/948510266/mozart-reimagined-photography-book-by-tyson-vick )on your social media sites (Twitter, Facebook, Instagram, Pinterest, Tumblr, etc.!) You can use the hashtags #tysonvickphotography and #mozartreimagined if you like to tag your posts. It would help out immensely. Thank you all for your support over the years! I’m excited to finally be producing the book!

Mozart Reimagined – La Betulia Liberata

3 Aug

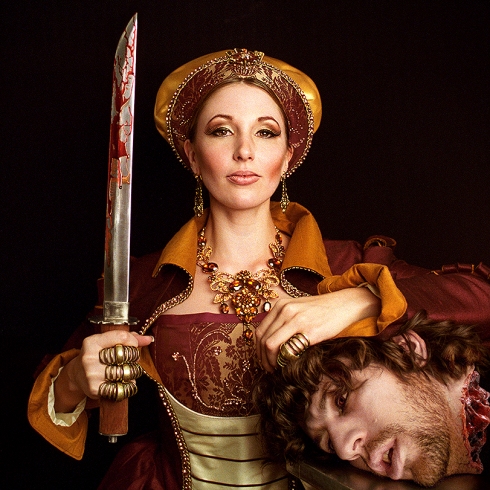
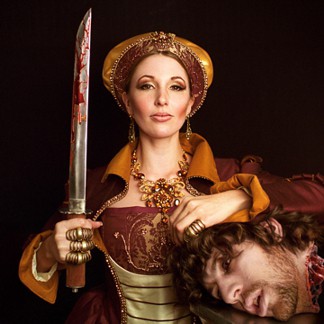
Mozart Reimagined by Tyson Vick will feature photos illustrating Mozart’s “La Betulia Liberata”, an Oratorio about the famous subject of Judith slaying Holofernes!

Mozart Reimagined features four award-winning photos by Tyson Vick illustrating the oratorio La Betulia Liberata

Mozart Reimagined features four award-winning photos by Tyson Vick illustrating the oratorio La Betulia Liberata

Mozart Reimagined showcases nearly 100 photos that bring to life Mozart’s operas through photography. I spent a decade building props and sets, meeting models and photographing across the country to showcase what Mozart’s music has meant to me. The book also features essays written about each opera from my own unique perspective. The book humorously points out plot-holes, gives insight into past and present performances, recites a little bit of History and overflows with my own passion for the music of Mozart.

The La Betulia Liberata photographs are an award winning set (1st place WPPI 2014) and were created with the help of a grant from The Puffin Foundation!

Here’s an excerpt from the book which accompanies the La Betulia Liberata pictures:

“As to the text, the story may be familiar to fans of The Lord of the Rings who can recognize both the walled city and the miraculous self-routing of the villains as scenes which occur in those famous books. The Apocryphal book of Judith, like The Lord of the Rings, is itself an invented mythology based on legend, myth and history. It draws heavily from the book Judges in the Bible, and tries to pass itself off as a sort of missing chapter from that book. The reason the book of Judith was not included in the Bible is first, because the book is clearly fictional but tries to pass itself off as historical – which has obvious implications – and second, because the moral of the story smacks strongly of “God helps those who help themselves,” which, while a famous adage, is nowhere supported by any Jewish or Christian text.”

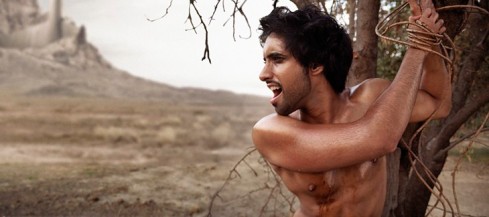
La Betulia Liberata, Act 1

La Betulia Liberata, Act 1

The models include Sukh Maan, writer Jaycey Rae and artist Xak Vowell. You can go behind-the-scenes with these award winning photos here.

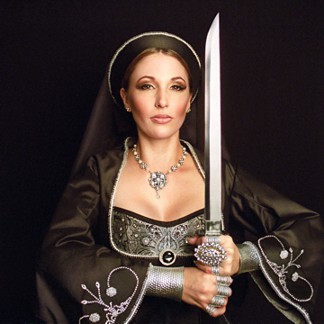
The Widow of Manasses.

The Widow of Manasses.

You can also check out some behind-the-scenes work on the costumes worn in the photo here!

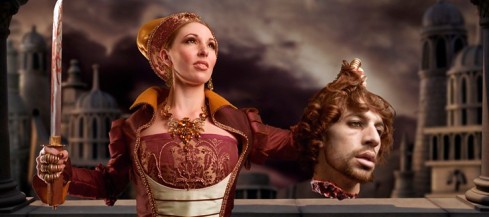
La Betulia Liberata, Act 2

La Betulia Liberata, Act 2

I’m going to be giving you a preview of photos from every chapter of Mozart Reimagined over the next month, and then it will be time for pre-orders. I will be launching pre-orders on Kickstarter on September 14th, 2015! Until then, I wanted to give you a glimpse of some of the photos and excerpts from the book so you can see what’s in store! Subscribe to the blog for every update, or check back on September 14th for the launch of the book.

From Concept to Completion for Tyson Vick’s Mozart Photography Project!

19 Jan

Well, I’ve Run Out of Costumes to show you. Over the past three months I have shared nearly every costume I created for my photographic illustrations of Mozart’s Operas. There are three or four pieces hiding in the closet somewhere that I’d like to dig out and photograph for you guys, but then I will have showed you everything!

While this project is getting ready to be compiled and put together in a book, I wanted to show you how it all began!

One day I was walking home from the library after looking for some Mozart Operas to get through the inter-library loan, and I thought, “Hmmm. Maybe I could illustrate my favorite parts of these operas through photography!”

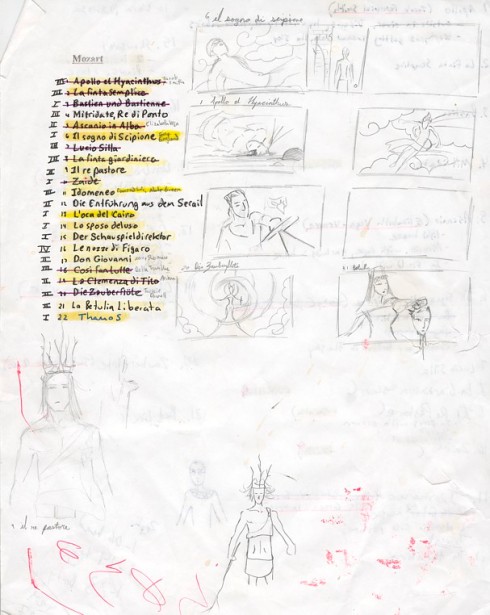
When I got home I drew some sketches on my opera list, which you can see below!

The first thing ever put on paper for my Mozart Photography Project.

The first thing ever put on paper for my Mozart Photography Project.

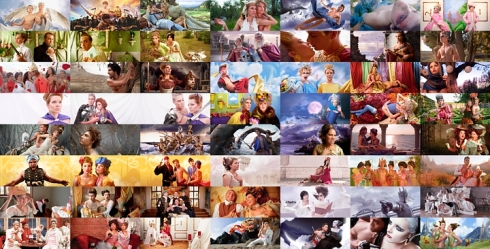
And after ten years, that list turned into this:

Half of the finished photographs all put together in a collage.

Half of the finished photographs all put together in a collage.

In the image above you can see a little over half of all of the photos I took to illustrate the operas of Mozart! You’ll have to squint, but you can even make out that two of the initial sketches seen in the top sketch image were brought to life and can be seen in the final grid of photographs– lol, it’s a lot of work but on the top image, far right sketch row, second box down (guy blowing away in wind) is the design for row 1 column 5 in the photo set. In the sketch far right, bottom, image of lady with severed head can be seen in the photos row three column 3.

Isn’t that fun to see an idea come to fruition?

Be sure to subscribe to this blog, because now you will start getting all of the information on the books progress! You’ll get to see some of the final photos, and the beautiful costumes, hair and make-up — both Historical and Fantastical! There are also a few costumes left to share with you once I get them photographed! These are exciting times!


Awarded 1st Place in WPPI Photography Contest!

12 Aug

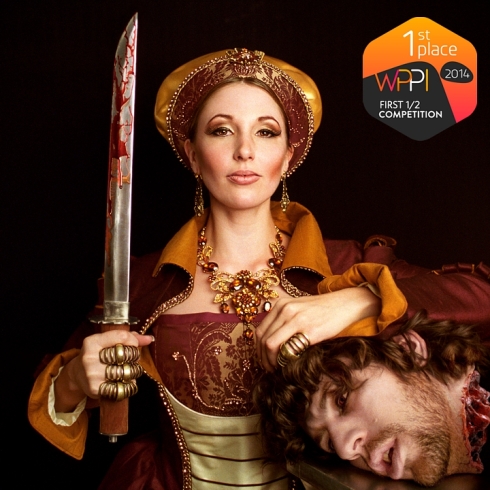
I am pleased to announce that my photo of Judith has won the First Place and Silver Award in WPPI’s Photography Competition in the Creative Composite Category in recognition of Photographic Excellence!

First Place Award - Creative Composite - WPPI Photography Competition

First Place Award – Creative Composite – WPPI Photography Competition

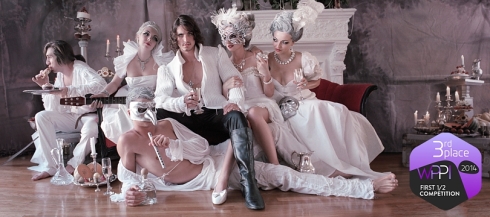
My Don Giovanni photo took 3rd Place in the same competition! Please check out the other winners and categories at the 2014 WPPI winners page!

Third Place Award - Creative Composite - WPPI Photography Competition

Third Place Award – Creative Composite – WPPI Photography Competition

Thank you to all of the models and stylists involved! Thank you also to the Puffin Foundation Grant which made the Judith photo possible!

La Betulia Liberata – The Photos

1 Apr

I would like to share the first of my finished Mozart photos with you, “La Betulia Liberata”! Based on the apocryphal book of “Judith”, Mozart’s Oratorio, “La Betulia Liberata” is a dark and beautiful work that I highly recommend.

The evil general, Holofernes, has trapped the people of Betulia within their walled fortress in order to starve them out.

Judith, the Widow of Manasses, decides to do something about it. She dresses in her finest garments and heads out to the enemy camp.

The Widow of Manasses.

The Widow of Manasses. By Tyson Vick.

One of the allies of the evil Holofernes, Prince Achior, warns him that the God of the Jewish people has a history of being very powerful. This enrages Holofernes, who ties the Prince to a tree, and leaves him to die. Hoping that if the elements don’t kill him, the Betulian patrol will. However, the Betulian’s rescue him and take him in.

La Betulia Liberata, Act 1

La Betulia Liberata, Act 1. By Tyson Vick.

Meanwhile, Judith goes to the enemy camp and pretends to seduce Holofernes, plying him with wine until his wasted out of his mind. Then she takes his sword, cuts off his head, and returns home, revealing the triumph to the people of Betulia, who disbelieve her story.

La Betulia Liberata, Act 2

La Betulia Liberata, Act 2. By Tyson Vick.

The enemy, finding their leader slain, think the Betulians have snuck up on them in the night, and they begin to fight amongst themselves, until they have destroyed each other, leaving Judith Triumphant.

Judith, Triumphant

Judith, Triumphant. By Tyson Vick.

You can read more about the making of these photos here.


One Delightful Day – June 18th, La Betulia Liberata

21 Jun

After the Idomeneo shoot, we went to bed.

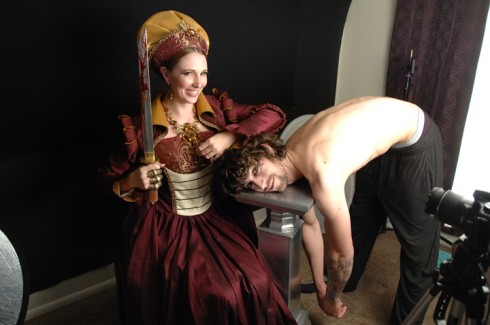
The next day Roman, Zack, Lizzie and I sprung awake to meet Jaycey to re-shoot my “La Betulia Liberata” photos featuring the ever-popular characters of Judith and Holofernes!

Jaycey smiling as Judith in her Widow costume. Zack getting his hair done as Holofernes.

The night before, Zack’s head was covered in a mask while his body was seen, on this day his head would be seen and his body removed from the final image! I asked him to grow a face-beard for the shoot, which he hated, and lamented, because it made his face itch. He was pleased to shave the moment the shoot was over!

Zack bloodies the sword while Maisey looks on.

The shoot was very laid back, in contrast to the very active and busy shoot of the night before! The shoot was done in front of a simple backdrop, and the pictures meant to look more like classical paintings.

Zack goin’ all samurai with the bloody sword.

Jaycey wore two costumes, including the Cranach style gown discussed in my previous blog entry, as well as a fancy “Widow of Manasses” costume. Zack only had to wear make-up because he will only be a severed head in the final photo! She looked very dynamic in her costumes, and — outside of these outtakes — looked very dignified and noble as Judith!

Jaycey and Zack. I told Jaycey to look delighted and triumphant at the defeat of Holofernes!

Roman and Lizzie reflected light for the first set of pictures, then Roman joined Lizzie’s husband Caenaan in the living room to watch an over-wrought cooking show with ridiculous music cues. “I just made a sandwich” BUM-BUM-BUUUUUUUUUUUUUUUUUUM!!!!!

Zack in full make-up as Holofernes’s head.

Jaycey was very delicate with Zack’s head., but Zack said that If I had hair, he would grab it just to show me what it was like to have someone pull on my hair for a half hour. Luckily, that scenario is incredibly far fetched. Me with hair? Ha! Ha!

Judith and Holofernes having a good ol’ time.

It was a very pleasant shoot, with a very pleasant team. Thanks to everybody involved! And a special shout out to Zack for putting himself through so many indignities this weekend, and Lizzie for being such a wonderful hostess!

La Betulia Liberata – Costume Diary, A Cranach Gown

14 May

Some time ago, no doubt you know, (and if you don’t, I’ll tell you so) I decided to re-shoot my La Betulia Liberata photo. La Betulia Liberata is Mozart’s operatic setting of the Apocryphal book of Judith. Judith is one of the most popular subjects in the history of art, and has been the center of countless paintings, operas and writings. One of the most famous images of Judith is by the painter Cranach.

Judith Victorious by Cranach

Cranach is famous for his “Cranach Gown”. This is a very specific type of gown that, throughout history, has only ever been seen in his paintings, and is generally the only type of gown that women wear in his entire body of work. Cranach painted dozens of images of Judith, and in every one of his paintings she appears in his Cranach Gown. When I decided to re-shoot my photos, I decided to pay homage to Cranach and design the image based on his famous work of art.

I decided to make a Cranach Gown with a collar, though there are many without collars.
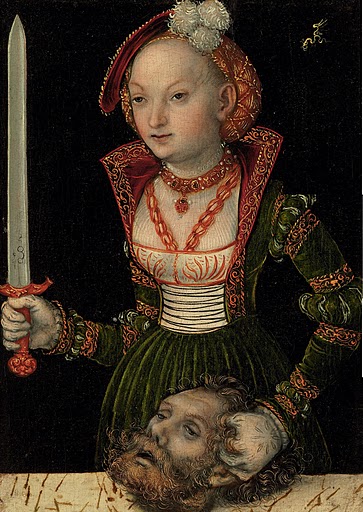
Judith by Lucas Cranach. This is the gown with a collar that inspired the direction I went with my gown.

At first, I wanted to make the garment out of velvet, because this is the fabric that is usually used for Cranach Gowns. However, velvet is difficult to work with, and after some consideration and discussion, I decided to use a Burgundy colored silk instead.  In order to make the gown, I did some research. I received some advice from Dragonfly Designs by Alisa and American Duchess, who provided this list of resources, in case you are interested in making your own Cranach Gown:

Reconstructing History Pattern – A pattern for a Cranach Gown.

Karen’s Sewing Corner -A site with sections dedicated to info about Cranach Gowns.

Elizabethan Costuming Page – A site about Elizabethan Sewing Techniques

Naergi’s Costume Site – A site with a break-down of details from various Cranach Gowns.

After looking up all the images I could find of the final product you get from building the Reconstructing History gown, I decided against using it. The reason for this is because every gown I saw that used the pattern looked a little frumpy. So, I read up on the pattern, and the person who drafted the pattern firmly believes there is not corset or boning in the gown. I disagree. Every image you see of the gown is tailored or fitted, which means there is some sort of structure within the gown.

However, in a fully boned/corseted version made by Sandy Powell for the film “The Other Boleyn Girl”, the garment looks too stiff and rigid — the polar opposite of frumpy.
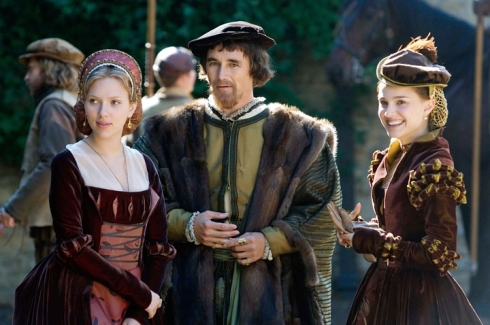
Sandy Powell’s Cranach style gowns for “The Other Boleyn Girl” on the far left and right.

I have come to believe that there is a split between structure and lack of structure, and to get the effect there must be buckram somewhere in there.

In the end, the historical construction process seemed like it would be too labor intensive and complicated, anyway, so I just decided to wing it.

I grabbed the pattern closest to the effect I wanted, which was Simplicity 2172, and I went to work. My goal isn’t historical authenticity, but rather, to get a cool looking outfit inspired by Cranach.
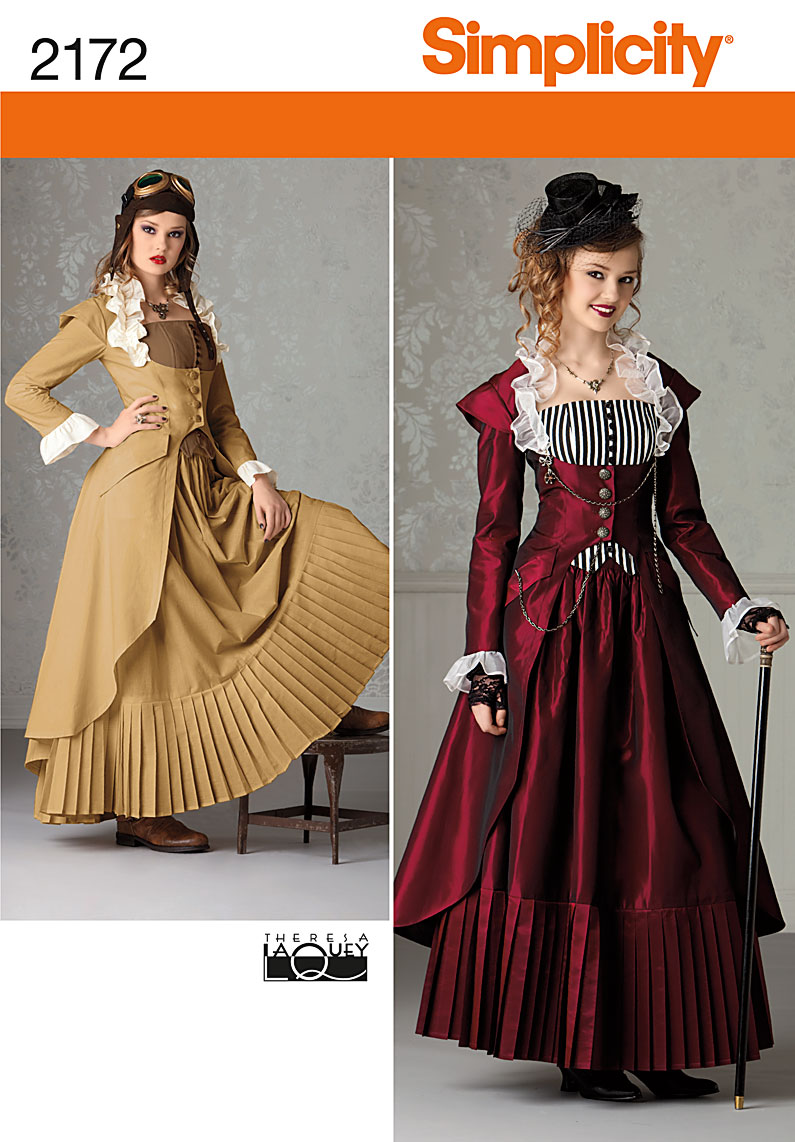
Simplicity 2172 is the pattern I altered to make my gown.

First, I built the corset to go under the jacket. I used a dark-red/gold damask. I have to warn you that when you follow the directions for this corset pattern, the bottom edge of the corset always ends up bendy and weird. I’ve never been able to get it to lay like it does in the photo on the cover.

My gown started with a base corset made of a pretty upholstery damask. Here it is in pieces.

I wanted the bodice to be beaded as seen in some of Cranach’s paintings. I went to the bead store and found some tear drop shaped beads that catch light from every angle, which is great for photography. I also picked up some regular seed beads.

Here are some of the beads I bought to bead the front of the corset with. The tear-drop shaped beads on the left catch light from every angle, which is why I chose them.

I sewed the beads on while watching the first season of “Legend of the Seeker”, which I quite enjoy. I am not so fond of the second season, because every character dies every single episode, but then they’re suddenly revived at the climax, because… magic! — or something –and it just stops being dramatic when the stakes are cranked up to 11 for every episode. But the first season is good drama all around. An alarming amount of guest stars get killed, though.

Once the bead embroidery was finished, I sewed the corset pieces together.

Next, I started to work on the jacket. I altered the Simplicty pattern quite a bit. I also added trim, which I then beaded. I find trim alone always looks cheap, but when you add things to it, it looks much better! I put a collar on my jacket as well. During this process I watched “The Guild”, which is a comedy internet program that I own on DVD. It is one of my favorites.

Next, I built the bodice/stomacher to go around the corset. I used various colored silks for the fabrics, and leather for the lacing. After I sewed my trim on, I added beads, to give it that extra touch.

When I came to the sleeves, I had a bad case of sewer’s block, and had to take numerous weeks off to consider. I did not want to use the endlessly complicated historical techniques. Then, a friend came over and gave a suggestion. She said to take a pile of fabric, make a tube and slash it on the bias. While this process would have been much easier to explain with pictures, I was too busy figuring it out to take pictures. However, it did work! So, I think this is probably the correct technique. Compare the sleeve detail below to the sleeve detail on the top image of Cranach’s Judith. The only difference is the painting has three rows!
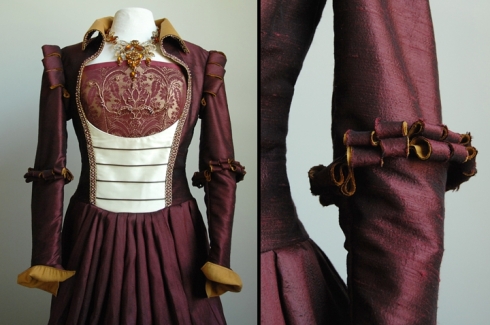
Here you can see the finished gown, which looks more tailored than most Cranach style gowns, which was the effect I was going for. I also include a close up of the slashed sleeves.

I decided to leave the top slashes larger than the elbow slashes.
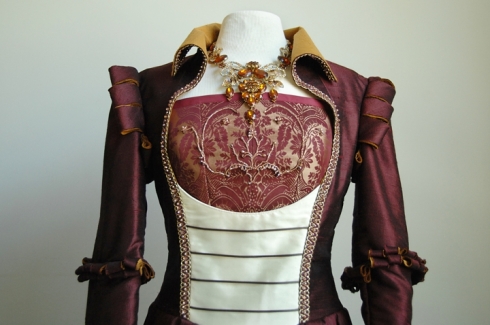
Here is an image of the finished bodice all put together, including the necklace that will be featured in the shoot.

So, that’s that.

If you would like to see dozens of paintings of Judith by Cranach, visit the Blog Judith2You, which features an endless supply of art based on the subject of Judith.

See you all later!

Cranach gown