For my upcoming photo shoot of Mitridate, the tyrant king needed some fancy armor. Buying custom armor is very expensive, and so I went with the standard Cosplay route of making my own!
Cosplay is a hobby where a fan creates an outfit and dresses up like a popular fictional character (Star Wars, Video Games, Anime). The cosplayer often has to use Craft Foam to make their own armor. This is something I did before I knew what cosplay was, but when I found out about cosplay, I was very pleased to find that they provide many useful tutorials on making things out of craft foam. I have adopted a few of their recommendations over the years, and I would like to make a little tutorial to show you how I created Mitridate’s breast plate using all of these techniques.
Update (April 2013): I am now able to share the final image so that you can see the breastplate in action!
Craft Foam Breastplate.
(Note: Any piece of armor you make will utilize these tools. This post will only focus on the breast plate, however.)
Step 1. – Gathering Supplies:
- Craft Foam (Available in many colors at craft stores like Michael’s. I use white mostly.)
- Gauze Fabric
- Large Gauge Wire (I used AnchorWire Multi-Purpose Wire, 16 Gauge.)
- 3D Paint (I used Delta Accent Liner – Air Dry PermEnamel for glass ceramic and tile.)
- Gesso
- Metallic Paint
- Metal Leafing supplies (Leaf and Glue)
- Jewelry pieces (If you want accent details)
- Hot Glue
- Mod Podge
- Scissors and Knives
- Straight Edge
Step 2. – Making A Craft Foam Form
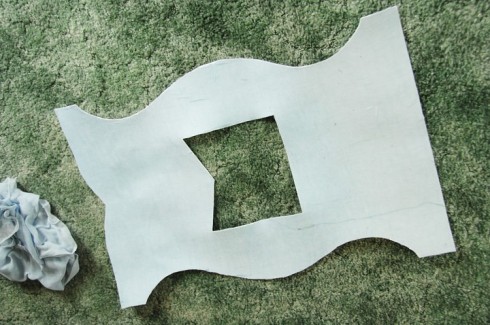
First, I drew a picture of what I wanted to make. Then, I took the measurements of the model and padded out my dress form to match. Then, I took a large blank sheet of Craft Foam and guessed at making a pattern. I do this sort of thing quite a bit, and I realize this might be difficult for some people to do. I have put the final cut-out piece on my cutting mat so that if anyone wants to know the dimensions, they can see them in the picture.
The following image of a foam rectangle with a hole cut out of the middle is the breastplate. The head goes through the hole, pointed edge facing the chin, and the foam covers the breast and back.
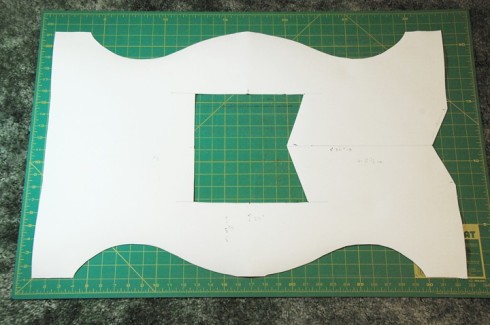
Here is the foam breastplate cut out. I laid it on the cutting mat in case anyone wants to know the dimensions.
Step 3. – Adding a Fabric Backing
My next step was to cover this craft foam piece with fabric to add durability. I used a cheap gauze from JoAnn’s (It’s like .99/yd) and glued it to the back of the foam using Mod Podge. Mod Podge is a glue/sealer that is available at most stores that sell craft supplies. It comes with many specialized finishes and consistencies (Matte, Glossy/Fabric, Paper Mache). I used the basic Matte version. Many tutorials talk about mixing glues with water, etc. to get the correct consistency, but since Mod Podge has already perfected it, why bother mixing? The Mod Podge dries with quite a bit of flexibility, unlike some glues (like Tacky Glue) that dry hard.
This step is recommended by many cosplay tutorials, and this is the first time I adopted it for one of my projects. I chose to use it because the craft foam needs to support the weight of a cape in the photo, and I thought extra stability would be useful.
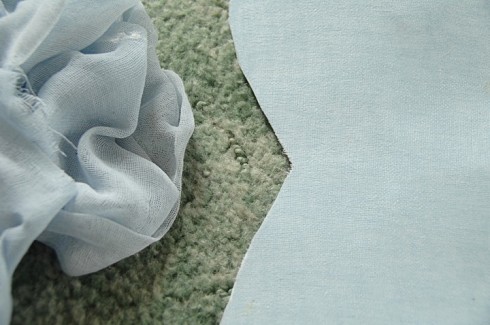
The next step is to use a fabric and glue it to the back of the foam to add durability. I used a cheap gauze that I had laying around, and put a layer of Mod Podge (Matte) on the foam and then over the top of the fabric.
In the pictures you will see the un-glued fabric gauze sitting next to the craft foam in case you need an idea of what the fabric looks like. On the back of the foam I put a layer of Mod Podge, and then smooth the gauze over the top of the glue. Next, I add another layer of Mod Podge over the fabric. This is generally a messy process, and you can use gloves if you prefer.
I know I do.
Then, you wait for the glue to dry. Once the glue is dry, you can trim the edges to match the craft foam.
Step 4. – Wire Edging
This is a step that I have never seen on any other tutorial, but it is one that I have always used. I take a large wire, I used 16 Gauge Multi-Purpose wire, and hot glue it to every edge of the craft foam. I glue it on the back, the side with the fabric. This wire can later be bent to shape the armor in any shape you want. It is very much like how Millinery wire is used in the brim of hats. The wire needs to be thick enough to support its own weight without bending, but not so thick that you cannot reshape it easily. I bought a spool at Lowe’s.
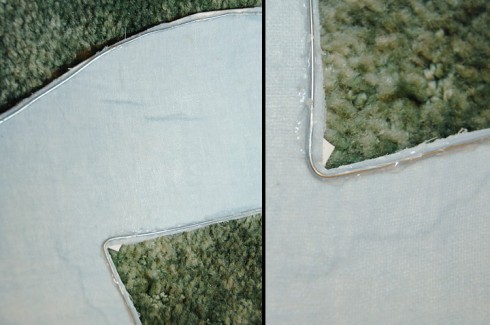
Here are two close ups of the wire that I hot-glued on the back edges. This will help shape the foam into any shape you care to have, and it will hold.
Step 5. – Decoration that goes under Edging
With this project, the wire will be covered by craft foam edging in a later step. Therefore, anything that goes under this edging needs to be finished now.
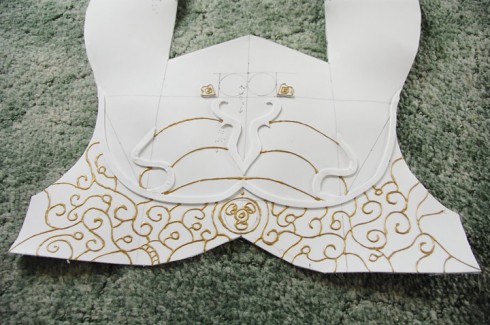
Using some drawn guidelines, I glued strips of craft foam to the front of the breastplate. I also took a 3D Paint (Delta Accent Liner – Air Dry PermEnamel for glass ceramic and tile) to make a fancy etching-style pattern on the front lower edge of the breastplate. This “etching” matches the tattoo that Farnace wears in my previous Mitridate Photo. The 3D paint is applied in two layers on this particular project.
I also have Jewelry Pendants and Findings that will be added towards the end. In the image below, you can see there are some circles drawn in where one of these will go.
Step 6. – Craft Foam Edging
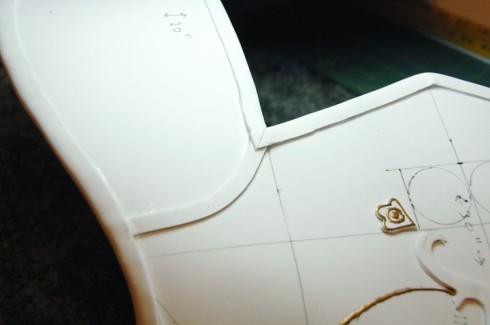
This is the step where I cover the wire, and created a nice finished edge all around the breastplate. Using a strip of craft foam which is wide enough to cover the wire in the back and the rough edges on the front, I hot glue the strip all around every edge of the breastplate.
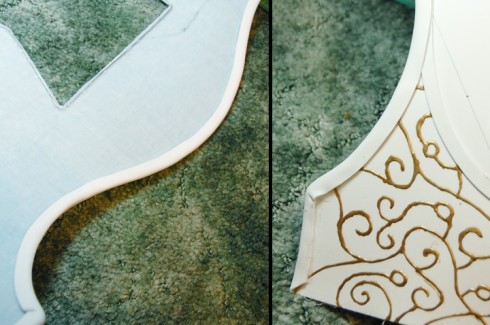
These two images show the craft foam edging which covers both the wire on the back (left) and the rough edges on the front. (right)
Sometimes I do not use this step. You can get away with just leaving the wire exposed on the back if it will never be seen, and you don’t want a raised edge all around your piece.
Step 7. – Gesso that Sucka!
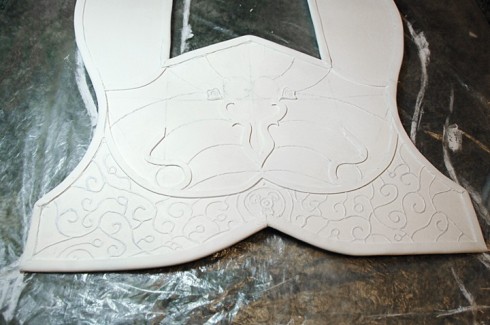
The next step is to prime the piece for painting. I use a primer which comes highly recommended to me, and from me, called Gesso. It is a very nice primer.
Step 8. – Painting, Leafing, Details
Next, I painted my breastplate with two types of paint. One is your typical Silver acrylic paint, and another is a metallic paint from “Sophisticate Finishes”. Sophisticated Finishes make the best looking, affordable metallic paints. In the image you will see the blue-metal is one of theirs.
I also used Silver Leafing on top of the silver painted areas once it was dry. Leafing is a technique where you put down a layer of special glue, wait for it to get tacky, and then apply thin sheets of metal over the top of the glue. Leafing is fairly difficult to learn how to do well and evenly, but the results are far better than the cheaper alternatives of metallic paint or Rub ‘n’ Buff. Actually covering the piece with metal leafing makes it look more like metal than any paint can.
Leafing is extremely messy, and many a wayward breath or gentle movement has sent the metal flying all across the room, but for all the trouble, and all the glue that bonds your skin together, and all the vacuuming, this is one of the only difficult processes that I swear by. The result is worth the trouble.
This is also the point in the process where I added my Jewelry findings, because they needed to be leafed to match.
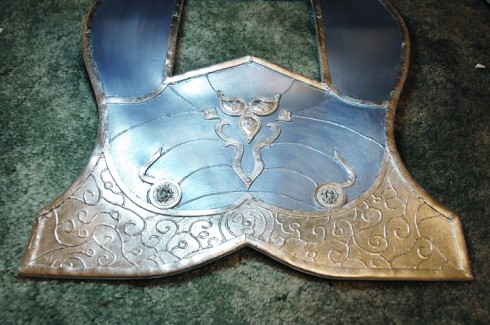
Here is the breastplate painted with blue-metallic paint and leafed with silver leafing. The Jewelry has also been added.
Step 9. – Finishing Touches
There are a few finishing touches that this piece needed. Different pieces will need different finishing touches. This breastplate needed eyelets for closure, sealer and distressing (not pictured). I use either Mode Podge or Leafing Sealer for the sealer.
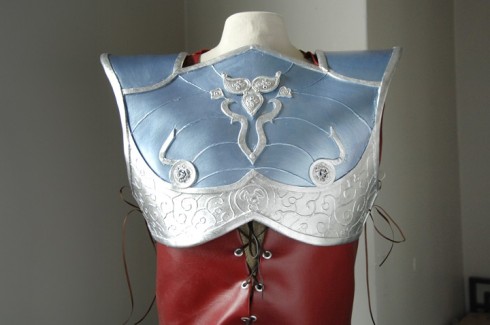
The Craft Foam Breastplate is seen here on a body form. The sides are held shut by running a string through eyelets. After this picture was taken I distressed and aged the armor, but this was a late decision and I will have no images of this effect until the final shot is taken.
Tutorial Achieved!
Any armor item you choose to make will use the tools and steps listed in this tutorial. This breastplate is only one of the many craft foam pieces I have made over the years. I have made masks, hats, models and props out of craft foam (and leafing) to achieve custom metal items at a low cost.
Mitridate’s breastplate was actually created to match a helmet I made for him over a year ago! The helmet, which is a great deal more complex, uses a plastic mask and paper clay in addition to the techniques listed above! You can see it in the image below.
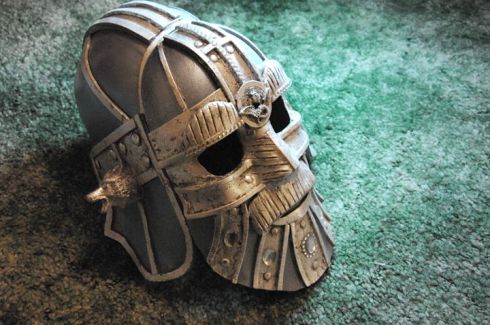
Mitridate Helmet to go with the Armor. It is made in the same way with craft foam, but on a plastic mask base. It is based off of a historical military mask called Sutton Hoo.
- Learn About the Opera Mitridate in my previous post!
- Visit another useful Craft Foam Armor Tutorial!




Nice work and great photos along with the write-up….have you ever worked with WONDERFLEX and or FOSSHAPE?
Thank you Brian! I have not worked with Wonderflex or Fosshape. I have used Paperclay quite a bit, often over the top of craft foam. I support almost all the things I make from craft foam with wire backing, and that holds the shape so well that I’ve never yet tried harder materials.
As an update, I have now tried using Worbla and I blog about it at my other website. Please take a look: http://www.steampunkmonsters.com/blog/2013/12/20/genie-using-worbla-to-make-a-steampunk-genie/
This is a great tutorial, thanks for taking the time to explain everything in such detail! Just to make sure I have understood everything correctly – you use only the metal wiring to shape your pieces, no heating of the foam to mold it?
Either way, I love the end result! 🙂
Hello Renate! I do not use heat to shape the foam at any point. I’ve heard of it being done, but my foam sometimes needs to support draped fabric or jewelry, and I find the wire keeps it’s shape, and if the piece gets sat on, or something, you can bend the wire back into the correct shape, forcing out the bend which would still be there in a piece without wire.
Oh thank you so much! Just about to start work on a Daedric Armor costume for my 7-year old son, and I was feeling completely lost, since I’ve never done anything of the sort. But I’m up for the challenge, particularly since finding your tutorial! One quick question–I notice you talked about using eyelets to fasten–can you give me a little more detail about how you fasten the eyelets to the foam? Also–how do you fasten fabric to the foam? Just glue?
Thanks so much! Your armor is really stunning.
Dear Genevieve,
I’m glad you found this useful! If you have not used eyelets before, most eyelet kits come with instructions. I fastened eyelets to the foam using the instructions on the eyelet kit, and it worked well. You hammer them together with some special tools, which was a little worrisome because I thought it would go right through the foam, but I was careful and it didn’t — you could test an eyelet out if you weren’t sure of how hard to smash the pieces together. I used Mod Podge to attach the fabric to the foam. I highly recommend Mod Podge (which is available at all craft stores) rather than mixing your own glue, unless you’re a glue mixing expert!
Hope this helps!
This is an excellent guide, I may try your technique to make something simple for starters, like bracers. I’ve been wanting to make armor out of foam, just haven’t tried it on this scale yet and your technique with the mesh fabric and wire sounds very achievable.
We have some foam armor guides on our blog too, SmallRiniLady made Final Fantasy armor http://www.craftersindisguise.com
Hello, this is a very helpful guide for someone who is just starting to use craft foam, so thank you for posting! I’m making a cosplay for Fran from FFXII, and she has armor all over her body. I was wondering if there are different types of craft foam, because I’ve seen the kind that is stiff but I need something that is more flexible. Do Michaels stores carry the bendable foam? If you could help me with this and recommend a brand of foam it would be much appreciated!
Dear Monique,
I go to Michaels and buy a Creatology Foam Roll for my work, usually. Here is a link: http://www.michaels.com/Creatology%E2%84%A2-Foam-Roll/gc1324,default,pd.html
This foam is not stiff, it is very flexible. I hope this helps!
Hi Monique,
I have recently worked with Worbla, a stiffer crafting thermoplastic, and blogged about it on my other site. Please take a look: http://www.steampunkmonsters.com/blog/2013/12/20/genie-using-worbla-to-make-a-steampunk-genie/
Reblogged this on The Fairy Thimble and commented:
One of many wonderful craft foam tutorials!
Great tutorial – armor looks fantasitc.
I’ve been asked to help build a fake metal boot for a costume, and was wondering if you might know where I can find some ideas and patterns? Something that would just quickly wrap around the lower leg and over a shoed foot so someone could walk around in normal comfortable shoes? It needs to be jointed at the ankle for walking
Thank you! I usually buy footwear because I’m never really convinced by the reality or durability of hand made shoe covers and things. But if you have a fabric store nearby, I do know that Butterick Pattern 5233 and Simplicity Pattern 1552 (The Hobbit One) feature boot patterns. Maybe you could adapt one of those? Type those names into google images to see the package envelopes. It may also be possible to research actual armor making and put together something out of craft foam in the same way. Something like this: http://armstreet.com/store/armor/medieval-combat-functional-armor-sabatons
I have a question: I have made a paper pattern for armor that is somewhat similar to this, but mine is longer in the front, & thus is too big to fit on a single foam sheet. Can you suggest a way to splice 2 sheets together seamlessly (or hide the seam), so that I can cut my breastplate out of one joined sheet? To clarify, my pattern is only a breastplate – no hole for my head to go through, like yours. I’m doing a separate breastplate, backplate, & pauldrons, connected by corset-style lacing for the two pieces that go around the torso, & hidden closures (velcro/snaps/buckles) to connect the pauldrons.
Hi Roketto! I’m sure you’ve finished your project by now. I only just saw your question, two months later! I buy a Creatology Foam Roll which is 36″X60″, and I’ve never had to make anything bigger than that. I would guess if you put your two pieces together, side by side, and added a wide strip of foam on the back side of the seam, and securely glued it down, then sealed the seam crack down the front, you could probably get away with it. One thing I know is that if you add seams to places where seams would go on real life armor, then the effect blends in very well.
This was a great tutorial, but i do have one question, how durable is the armor? Is it only good for a few uses? Or is it good for a a little while? Thank you.
Hello! The armor is pretty sturdy, but because the outer layer is foam, it can get dings in it pretty easy. Since I used this only once, I have thrown it around my closet, and it has stood up very well. However, if you want to be more certain of stability, have you considered using “Worbla”? In my other blog, I make some armor out of Worbla, please check it out: http://www.steampunkmonsters.com/blog/2013/12/20/genie-using-worbla-to-make-a-steampunk-genie/
Okay. I’ve been having problems with cloth backing for a while. I’ve looked…places like Joann’s do not have ‘cheap’ gauze. It’s all always $4 and up. Are you talking about cheesecloth? If so, what grade? Can you help me out here???
Hi, Zack! Yes, cheesecloth is correct. I do not know the grade. I just use whatever I’ve got hanging around.