I have just finished my week long embroidery spree as I create a jacket and gilet for my up comming Der Schauspieldirektor photo shoot. You can read about the play in one of my previous posts, or follow my costuming progress in my last post on the corsets I made.
I have to make all the costumes, and I have decided to costume my models in outfits inspired by a page in the book “Fashion” by the The Kyoto Costume Institute which features two fancy ladies outfits from the 1790s.
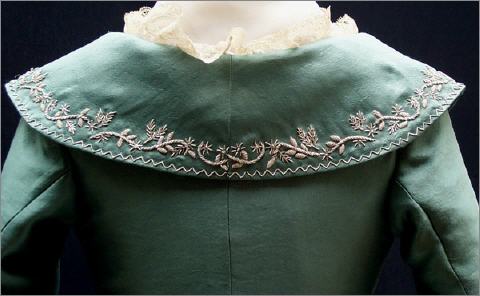
There is no pattern for the aqua blue jacket and gilet (a gilet is a sort of vest), and so I had to draft my own. Nobody actually seems to know what the back of the garment looks like.
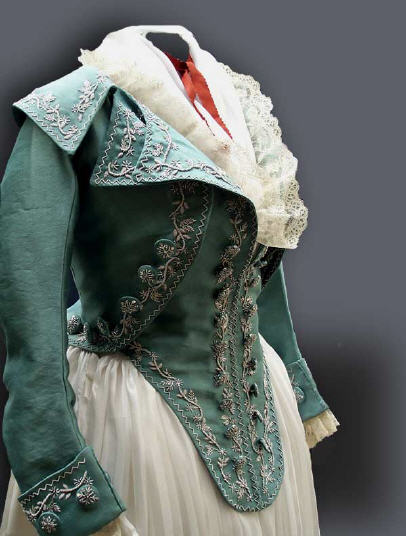
A reproduction of the teal blue jacket and gilet was made by the company Reine des Centfeuilles. I used their photos of the garment they made as my reference pictures.

This image shows a reproduction of the Kyoto Jacket and Gilet created by the company Reine des Centfeuilles. The website features more views of this garment than the Kyoto 'Fashion' book, and so I used their images as reference to create my pattern.
The Reine des Centfeuilles reproduction is very beautiful, and when compared to the original, shows that they re-drafted the embroidery pattern. Much of the original KCI (Kyoto Costume Institute) garment is worn and the embroidery is missing. The sleeve is also a much smoother cut on the RdC (Reine des Centfeuilles) reproduction.
My own embroidery is only suggested, or inspired by, the embroidery on the RdC garment. I did not have any satisfactory ways to transfer an embroidery pattern to my own garment, and so I did not feel the need to do something with such a diverse repeating pattern as the KCI and RdC jacket and gilet.
I printed out these images, took some muslin, draped it on my aunt, and while looking at the image, I cut out the rough shape of the muslin (I used part of a simplicity pattern for the side and back of the gilet.) I did not document this part of my journey, because 1. Documenting my work, interrupts creative focus, and I cannot easily create while documenting my process. Unless, of course, I feel completely at ease with what I’m doing. and 2. There is no sufficient light to take pictures at my aunt’s house at night.

Here is the muslin mock-up of the jacket front. The side seams are broken because I cut off the back to use that muslin for the collar pattern.
I drafted patterns from my muslin mock-up and cut out my silk, which I then interfaced to add support to the embroidery.

The cut and interfaced pieces of my own gilet pattern in "Sea Foam" silk... (Seam Foam is a fancy way of saying teal blue.)
My first step in embroidery was choosing a color! I chose embroidery floss DMC 3033 and 712, these numbers are merely the technical way to say “Ecru”, which, itself, is just the fancy way of saying “Off-white”. Then, I started to zig-zag embroider all the edges of my cut out pieces.
This process was completed by eye. I only measured the distance from the edge of the garment, and then I guessed at how far apart each zig and zag stitch should be. It’s not an exact science. Nobody cares how far apart the zigs and zags are… or if they do, they should probably be locked up in a home for the bewildered.
The zig-zag stitching took around two and a half days, and I watched, like, 10 movies while doing it. I just have to say that “Revolutionary Road” is a stupid movie, and the only difference between it and “Death of A Salesman” is that in the one, the salesman just dies normally, and in the other one he rips out his placenta and bleeds to death. Good times.
However, I can recommend the latest Pirates of the Caribbean (the one with mermaids). It is the only pirates film I enjoyed, and I particularly liked the end, where Jack is trying to escape from Penelope Cruiz, and she keeps coming up with outlandish excuses to get him to stay.

I cut out little vines out of heavy interfacing to "couch" embroider over, so that I didn't have to transfer a pattern.
I did not have a good way to transfer an embroidery pattern, and therefore did not see fit to draft the pattern from the RdC version. I decided an easy way for me to work would be to couch embroider my vines. Couching is where you take a cut out shape and then embroider over the top of the shape, encapsulating it in the embroidery floss. To make my shapes, I used heavy interfacing.

Here, the couching pieces are laid out on the gilet front. I glued them on with Aleene's dry cleanable Fabric Fusion glue.
I cut out many pieces using only two different shapes and laid them out in different formation on my jacket and gilet pieces. I then spent a few days couching over my vines.
I watched mostly “Leave it to Beaver” during this stint, with another 10-or-so movies thrown in. I just have to say that the original Rollerball is an idiot, and its non-plot is frustrating all the way through.
So, the sports players play rollerball, and the “bad guys” keep changing the rules, such as “today there will be no-time limit”, which is just as head scratchingly bad as it sounds. Can you imagine baseball or soccer with no time limit? But instead of getting bored and chillin’, like they would in real life, the Rollerballers decide to kill each other. End film.
Maybe it was just too deep for me.
I far preferred “Dan in Real Life”, which is about a single dad with three daughters who goes to a family reunion and learns to love again. It’s cute.

Here is a close up of the couching embroidery, where you can see how the thread is sewn over the vine shapes.
I drew a little pattern to help me remember where each flower, leaf and vine would go, and then started adding fancy things to the vines. However, I didn’t like the embroidery leaf that I did, so I cut out some interfacing leaves to couch over as well.
I then spent the rest of my days adding flowers and sprigs and watching more “Leave it to Beaver.”
The parents in “Leave it to Beaver”, Ward and June, always make me laugh. They’re really funny. I like it when Ward accidentally locks June in the closet, and when June tries to deal with her kids hanging out with white-trash. I like how sometimes Ward says sexist things and then they both snicker, as if they’re in on a joke that the writers aren’t.
This is my second time through the series, and I’m starting to get the sneaking suspicion that Ward’s dad was a physically abusive bastard. I think that Ward and June have this secret running joke about how much of a dick the guy was. Maybe it’s just the difference between the 50s and today, and I’m reading too much into it, but they never talk about Ward’s dad without smirking a little, as if they think it’s funny how much of a tool the guy was. My strongest evidence to support this theory is that they never mention the guy when Wally and the Beaver are in the same room… as if they don’t want their kids exposed to their dead grandpa’s douche-baggery…
Sneaky parents…
I embroidered for many days, and no matter how many exciting adjectives I add to any given sentence about embroidery, it really just isn’t that exciting of a thing to describe.
“I nobly raised the shining embroidery needle high into the air, and then with a gallant thrust — Wham! — I plunged it deeply into the sturdily interfaced silken fibers. The needle screamed, surging through the silk, spreading the threads aside, like when Moses parted the Red Sea. A sinewy trail of embroidery floss quickly followed behind the needles’ ever-vigilant eye, streaming through the puncture hole as if it were a snake crawling into its sinister hole beneath a gloomy rock. Suddenly, the needle turned upward in my hand, and with another violent thrust — wham! — it ripped once more through the fibers…”
After 7 days of working between 8 and 12 hours a day, I finished my embroidery!
My next step will be to sew all these things together and see if they actually make a wearable garment!
Come back again next week to find out how far I have progressed — and maybe some of these things will actually start looking like clothes!
- Visit this Reine des Centfeuilles page to look at some of their garments!
- Visit American Duchess for more Historical Costuming!
- Buy the Kyoto Costume Institute’s book “Fashion“.
Update – All the Posts From This Series:
- My first post follows the making of the corsets for both ladies.
- The second post takes a look at my embroidery process, and brief reviews of some of the movies I viewed while sewing.
- The third post shows how I put together my Jacket and Gilet.
- My fourth post shows the inspiration and final pigeon breasted drawstring-front jacket.
- The fifth post talks about the hats I created, and features a step-by-step construction process.
- The sixth post shows outtakes from our photo shoot and the ladies in costume.


Tyson, this is really quite beautiful!!! Well done!! You’ve inspired me–I’m going to have to explore some couched embroidery in some future projects. It’s really quite gorgeous!!!
And your television and movie observations are witty and helpful! I hadn’t noticed that about Leave It To Beaver, but I see it now! Haha!!
Thank you! I couched over 1/16″ thick double sided fusible interfacing shapes, because when you iron it, it bonds to the embroidery. I don’t know if this is a good idea, but it sounded like a good idea to me. I thought it would make it sturdier!
Wonderful! You are going to make so many of us jealous. I am truly impressed, and I can’t wait to see the whole thing put together 🙂
Hi Lauren! The whole internet seems to agree that this outfit is one that costumers love, and I’m no exception! It’s coming together nicely, and I should be done tomorrow!
Oh lovely! I love how simple and basic your embroidery is, but how effective it looks, especially in the final photoshoot.
Thank you! I think it worked out very well! It took much longer to build the embroidered costume than most costumes take, but I think it is very pretty too!
You are INSANE!!! WOW! I can’t believe how much work you’ve put into this project! The tiny details… I can’t begin to imagine the amount of time you must’ve put into this! Great job!
The amount of time put in is Five years and counting!
Wow, this is some very lovely and painstakingly done work. I really like how you did the work in progress photos on here, but that narrative on the embroidery made me laugh so hard. It was like a romance novel spoof. Thanks for the jokes and inspiration, you’ve earned a new follower. ^^
Welcome to my blog, and thank you!